Most homeowners and business owners approach solar installation with one burning question: “How long will this take?” The honest answer is 60–90 days from your first call to the first unit of solar electricity reaching your meter. But that range hides a lot of variation, and understanding what drives it puts you in control.
The timeline isn’t mostly about physical installation. The panels and inverter go up in 2–4 days. What takes 60–90 days is the sequence of approvals, paperwork, inspections, and government processes that surround the physical work. In Gujarat, UGVCL and DGVCL have streamlined their processes to the point where the fastest installations complete in 45–55 days. In other states, 75–90 days is more typical.
This guide maps every stage in the process, tells you exactly what happens on each set of days, and tells you what you (as the homeowner or plant owner) should be doing at each stage.
Key takeaway. A rooftop solar installation in India takes 60–90 days from application to first generation, broken into 9 stages: site survey, proposal, contract, PM Suryaghar application, DISCOM feasibility approval (the longest wait, 15–30 days), material procurement, physical installation (2–4 days), testing, and net meter commissioning + subsidy disbursement. Heaven Green Energy completes installations in 45–55 days in Gujarat through UGVCL and DGVCL fast-track lanes.
The 9-stage journey below is your complete map.
The Heaven Green 9-Stage Solar Journey (Framework)
This is Heaven Green Energy’s proprietary framework for the complete rooftop solar process, built from data across 10,000+ installations. Each stage has a defined owner (you vs us vs DISCOM), a defined deliverable, and a typical clock.
Stage 1, Site Survey (Day 1)
The process starts with a site survey. Our engineer visits your property, measures the available roof area, checks for shading sources (water tanks, parapets, neighbouring buildings), assesses the roof structure type (RCC, tin shed, metal deck), and identifies the electrical connection point, typically the main distribution board location.
What the survey produces: a shadow analysis report, a tentative system size in kW, and an initial layout sketch showing panel count and placement. The survey takes 45–90 minutes on-site.
What you should do: Be present or designate a family member. Have your latest electricity bill ready, we use 12 months of consumption data to size the system correctly. Point out any planned roof modifications, additions, or future shading sources (a water overhead tank you plan to add, for instance).
Stage 2, Technical Proposal (Day 2–3)
Based on the site survey, we prepare a detailed technical proposal including: system size in kWp, panel brand and model, inverter brand and model, mounting structure type, expected annual generation in kWh, estimated bill savings in ₹, and the total installed cost net of PM Suryaghar subsidy. The proposal also includes a generation guarantee statement.
Stage 3, Contract Signing (Day 4–7)
Once you approve the proposal, a formal EPC contract is drawn up covering: equipment specifications, warranty terms (5-year workmanship + manufacturer warranties), payment schedule (typically 40% advance, 60% on completion before net meter), timeline milestones, and escalation clauses. Review the warranty section carefully, it should explicitly mention workmanship warranty duration, process for claims, and the PM Suryaghar 5-year minimum requirement.
Stage 4, PM Suryaghar Application (Day 7–10)
After contract signing, we submit your PM Suryaghar application on the PM Suryaghar national portal on your behalf. The application requires: your consumer number, Aadhaar details, a photo of your electricity bill, and the proposed system specifications. Within 24–48 hours of submission, the portal generates an application reference number.
💡 Fast tip
Keep your consumer number (from your electricity bill) and Aadhaar number ready from Day 1. Document submission delays are the single most common cause of application processing holdups.
Stage 5, DISCOM Feasibility Approval (Day 10–30)
The DISCOM (your electricity distribution company, UGVCL, DGVCL, PGVCL, or MGVCL in Gujarat; MSEDCL in Maharashtra) reviews the application and approves feasibility. This means they check whether your connection can handle the proposed solar export and whether the local grid section can accommodate additional generation.
This is the stage most consumers underestimate, and it is typically the longest single wait in the process. Gujarat’s DISCOMs have improved their processing times significantly; UGVCL and DGVCL can now approve feasibility in 10–15 working days in many urban areas. Other states may take 20–30 days.
What you should do during the wait: This is a good time to confirm your bank account details for the subsidy Direct Benefit Transfer (DBT), review the solar monitoring app you’ll use once the system is commissioned, and prepare the installation access (clear the roof of debris, ensure ladder access).
For UGVCL-specific process details, see our PM Suryaghar UGVCL guide. For DGVCL, see our PM Suryaghar DGVCL guide.
Stage 6, Material Procurement (Day 30–35)
Once DISCOM feasibility is approved, we place the material order. For standard BIS-certified panels and string inverters, lead time is 3–5 days from our regional warehouse. For custom specifications (high-wattage TOPCon modules, three-phase inverters), allow 7–10 days.
Stage 7, Physical Installation (Day 35–40, takes 2–4 days)
The actual installation. Our team arrives on the agreed start date with all materials. Installation sequence:
- Mounting structure installation: anchor brackets to the roof structure, fix horizontal and vertical rails, torque to specification
- Panel mounting: fix panels to the rail system using mid and end clamps, wire panels into strings
- DC cabling: run DC cables from panel strings to the inverter location, via the DC distribution box (DCDB)
- Inverter installation: mount the inverter (typically on an interior or shaded exterior wall), connect DC input and AC output
- AC cabling and protection: wire inverter AC output through the ACDB to the main distribution board
- Earthing and lightning protection: install earth pits, bond all metal structures
- Commissioning test: power up the inverter, verify DC string voltages, confirm AC export to grid
A 3–5 kW residential system takes 1–2 days of installation time. A 10–30 kW commercial system typically takes 3–4 days. The site is clean, inspectable, and ready for official DISCOM commissioning at the end of this stage.
Stage 8, Testing and Pre-Commissioning (Day 40–42)
Before the DISCOM inspection, we conduct our own commissioning tests: string-level IV curve verification (confirming each string matches its design output), insulation resistance test on DC cables, earth continuity test, and inverter parameter configuration check (grid frequency and voltage set points per CEA technical standards).
We generate a commissioning report that becomes the handover document at DISCOM inspection.
Stage 9, DISCOM Inspection, Net Meter Installation, and Subsidy (Day 42–90)
The DISCOM schedules a technical inspection of the installation. In Gujarat, this typically happens within 10–20 working days of the commissioning report submission. The inspector checks: the installation against the approved design, earthing, protection devices, and the inverter’s anti-islanding protection function.
After approval, a bi-directional net meter (replacing your existing single-direction meter) is installed. From this point, you are officially commissioned and generating solar electricity, exported units accumulate as credits on your account.
The PM Suryaghar subsidy (up to ₹78,000 for systems ≥ 3 kW) is disbursed as Direct Benefit Transfer (DBT) into your registered bank account within 30 days of successful net meter commissioning. Total DBT receipt: Day 70–90.
For a complete walkthrough of the commissioning process in Gujarat, read our solar commissioning Gujarat guide.
Day-by-Day Timeline Summary
| Stage | Days | Owner | What you do |
|---|---|---|---|
| Site survey | Day 1 | EPC | Provide access + electricity bill |
| Technical proposal | Day 2–3 | EPC | Review and approve |
| Contract signing | Day 4–7 | Both | Read warranty section carefully |
| PM Suryaghar application | Day 7–10 | EPC | Provide Aadhaar + consumer number |
| DISCOM feasibility approval | Day 10–30 | DISCOM | Wait + confirm bank details for DBT |
| Material procurement | Day 30–35 | EPC | Clear roof access |
| Physical installation | Day 35–40 | EPC | Observe, note all serial numbers |
| Pre-commissioning testing | Day 40–42 | EPC | Review commissioning report |
| DISCOM inspection + net meter | Day 42–70 | DISCOM | Be available for inspector visit |
| Subsidy DBT | Day 70–90 | MNRE/DISCOM | Confirm receipt in bank account |
What Causes Delays, and How to Avoid Them
The DISCOM feasibility and inspection stages cause 80% of all timeline overruns. Here’s what extends each stage and what you can do:
DISCOM feasibility delays:
- Incomplete application documents, missing consumer number, wrong Aadhaar, mismatched name with bill
- Overloaded DISCOM processing queues (common in summer when applications spike)
- Technical issues: the proposed system size exceeds your sanctioned load, requiring a load enhancement application first
Prevention: submit documents in one go, with correct spelling. Ensure the proposed kWp does not exceed your sanctioned load capacity, a 3 kWp proposal against a 2 kW sanctioned load triggers a load enhancement request adding 15–20 days.
DISCOM inspection delays:
- Inspector scheduling backlogs, common post-monsoon when many installations complete simultaneously
- Site not ready: roof not cleared, no access provided, contractor not available for inspection
Prevention: schedule the inspector within 48 hours of physical installation completion. Have the EPC present at inspection with all documentation.
Subsidy DBT delays:
- Bank account details incorrect in the PM Suryaghar portal
- Net meter installation date not updated in the portal by the DISCOM
- KYC mismatch between Aadhaar and bank records
Prevention: verify your bank account in the portal before commissioning and request the DISCOM to update the commissioning date promptly.
⚠️ Watch out
Never start physical installation before DISCOM feasibility approval. Installing panels before approval puts you at risk of rejection, forced removal, or loss of subsidy eligibility. A trustworthy EPC will never push you to "start work and get approval later."
Gujarat Fast-Lane: UGVCL and DGVCL Timelines
Gujarat is one of India’s most solar-progressive states. UGVCL (Uttar Gujarat Vij Company Limited) and DGVCL (Dakshin Gujarat Vij Company Limited) have both invested in streamlined PM Suryaghar processing that can compress the standard 60–90 day timeline to 45–55 days for clean applications in well-covered areas.
UGVCL fast-lane characteristics:
- Online feasibility review for systems up to 10 kW sanctioned load: often completed in 7–10 working days
- Inspection scheduling available within 5–7 working days in Ahmedabad and Gandhinagar circles
- Net meter installation within 10–15 working days of passed inspection
DGVCL fast-lane (Surat, Bharuch, Navsari region):
- Commercial centres (Surat city) often see feasibility approval in 10–12 working days
- Strong installer network means commissioning report quality is high, reducing re-inspection rates
For the fastest installation, choose a Heaven Green Energy installation team in your DISCOM zone. Our familiarity with each DISCOM’s specific submission format reduces rejection rates significantly.
The GEDA (Gujarat Energy Development Agency) website provides the latest guidance on DISCOM process updates and any state-level fast-track provisions under the Gujarat Renewable Energy Policy. For national-level solar programme data, the MNRE rooftop solar dashboard publishes state-wise installation progress monthly.
Also see our complete guide to solar installation in Gujarat for the regulatory and permit context around this timeline.
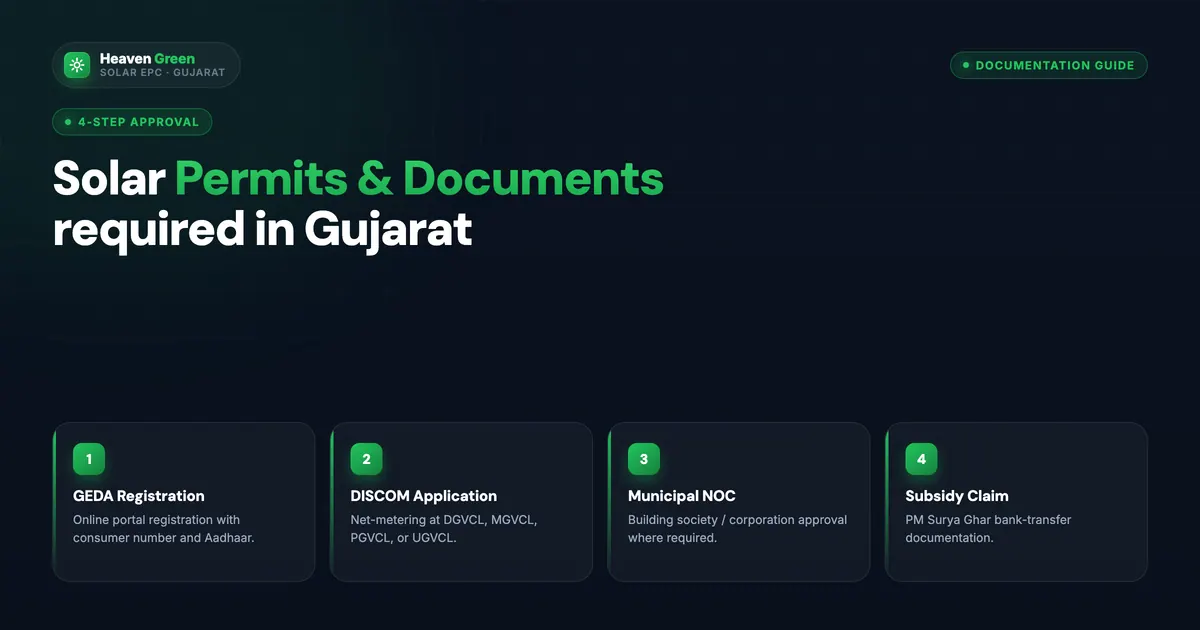
Permit and Grid Connection Requirements
Before installation, two formal approvals are needed in most Indian states:
DISCOM technical feasibility approval: covered above. This is the gateway approval that permits the installation to proceed.
Structural approval: in some housing societies and commercial complexes, you need approval from the Resident Welfare Association (RWA) or building management. For housing societies with shared roofs, the process is slightly different, see our solar for housing society guide.
CEA Technical Standards: the Central Electricity Authority (CEA) sets minimum technical standards for grid-connected rooftop solar systems, including inverter protection settings, earthing specifications, and metering requirements. All legitimate installers follow these; they are embedded in the DISCOM inspection checklist.
For a detailed breakdown of the permit documents required in Gujarat, read our solar permits Gujarat guide.
Pros and Cons of the Current Installation Process
- PM Suryaghar portal centralises application tracking in one place
- Gujarat DISCOMs have measurably improved processing times since 2024
- DBT subsidy reaches bank account directly, no intermediary handling
- Physical installation itself is fast (2–4 days)
- Experienced EPC can manage the entire approval process on your behalf
- DISCOM inspection scheduling is unpredictable in smaller towns
- Load enhancement applications can add 3–4 weeks to timeline
- Net meter installation sometimes delayed post-inspection
- Document mismatch (name in Aadhaar vs bill) requires re-submission
- No unified status tracking between MNRE portal and DISCOM systems
Ready to install? Talk to our solar engineer, we handle subsidy paperwork, net metering, and 25-year support. Call +91 63904 05060 or request a callback.
Commercial and Industrial Installation: Different Timeline Considerations
The 9-stage framework applies to residential installations. Commercial (10–100 kW) and industrial (100 kW+) installations add some additional steps:
Load sanction verification: commercial consumers may need to verify their sanctioned HT/LT load before system sizing. Oversized systems relative to sanctioned load require load enhancement.
Net metering application vs gross metering: commercial consumers above certain capacities in some states must use gross metering (all solar sold to grid, power purchased separately) rather than net metering. Confirm with your DISCOM at the application stage.
CEA approval for larger systems: systems above 1 MW may require CEA approval in addition to DISCOM approval. This adds 30–60 days.
EIA for chemical/industrial clusters: certain large industrial solar projects in regulated clusters (like Ankleshwar GIDC) may require environmental clearance screening, though rooftop installations under 25 MW are generally exempt.
For industrial solar timelines and the specific process for Gujarat’s industrial clusters, see our industrial solar solutions in Gujarat guide.
How Heaven Green Energy Manages Your Installation Timeline
Heaven Green Energy has completed 10,000+ installations across Gujarat and other Indian states. Our process management reduces average timeline by 10–15 days compared to the industry norm, through:
- Pre-verified document checklists: we identify document issues before portal submission, not after rejection
- DISCOM relationship management: our local teams in each DISCOM zone know the exact submission format and common rejection reasons
- Parallel processing: material procurement begins at DISCOM feasibility approval, not after inspection, compressing Stage 6 into Stage 5
Our service range:
- Residential Solar: complete 9-stage management from survey to subsidy, PM Suryaghar end-to-end
- Commercial Solar: 10–100 kW with dedicated project manager tracking each approval stage
- Industrial Solar EPC: 100 kW+ with full permit management and CEA compliance documentation
- Solar Calculator: size your system and see your savings before we even visit
Frequently Asked Questions
How long does it take to install solar panels in India?
The physical installation takes 2–4 days for a standard residential system. But the full process from application to first unit generated takes 60–90 days in most Indian states, and 45–55 days in Gujarat through UGVCL and DGVCL fast lanes. The majority of the timeline is DISCOM approval and inspection scheduling, not physical installation work.
When does the PM Suryaghar subsidy get credited?
The PM Suryaghar subsidy is disbursed as Direct Benefit Transfer (DBT) into your registered bank account within 30 days of successful net meter commissioning by the DISCOM. In practice, most consumers see the credit within 45–60 days of commissioning due to backend processing. The total timeline from application to DBT receipt is typically 70–90 days.
Can I start installation before DISCOM feasibility approval?
No. Physical installation must not begin before DISCOM feasibility approval. Starting without approval risks rejection of the net meter application, potential forced removal of equipment, and loss of PM Suryaghar subsidy eligibility. Any EPC that suggests starting installation before approval is cutting corners at your legal and financial risk.
What causes solar installation delays in Gujarat?
The most common causes in Gujarat are: incomplete PM Suryaghar application documents (name mismatch, missing consumer number), proposed system size exceeding sanctioned load (triggering a load enhancement request), and DISCOM inspection scheduling backlogs during peak season (April–June). Heaven Green Energy’s document pre-check process addresses the first two causes before submission.
How do I track my PM Suryaghar application status?
Log in to the national portal at pmsuryaghar.gov.in using your mobile number. The portal shows your application status at each stage: submitted, under review, feasibility approved, installation done, inspection requested, net meter installed, and subsidy processed. For DISCOM-specific queries, your installer can contact the DISCOM helpline directly.
What documents do I need for solar installation in India?
The standard document set includes: latest electricity bill (showing consumer number and sanctioned load), Aadhaar card, property ownership proof (or NOC if renting), passport-size photo, and bank account details for DBT. For commercial properties, add GST registration and authorisation letter if the applicant is not the registered consumer. Heaven Green Energy provides a pre-verified checklist at the site survey stage.
How long does the DISCOM net meter installation take after inspection?
After a passed DISCOM inspection, the new bi-directional net meter is typically installed within 10–20 working days in Gujarat. In UGVCL and DGVCL zones in urban areas, this is often 7–10 working days. In rural areas or smaller towns, allow 15–25 working days. Your solar system is generating from the day of physical commissioning, but net metering credits don’t start accumulating until the bi-directional meter is live.