More than 20% of rooftop solar installation delays in India are caused by roof-related issues that were never identified before the installation day. Waterproofing problems, structural cracks, inadequate load capacity, and severe shading, these are all preventable surprises if you do a thorough roof inspection before signing with any solar EPC company.
A proper pre-installation roof inspection takes 30–60 minutes and can save you from re-installation costs, delayed subsidy disbursement, and structural damage to your home. This guide walks through every check you (or your installer) should do, from structural assessment to shading analysis to DISCOM compliance.
Key takeaway. Before any solar installation, your roof must pass six key checks: structural load capacity, surface condition (waterproofing, cracks), usable shadow-free area, orientation and tilt assessment, electrical access routes, and DISCOM sanctioned load verification. Heaven Green Energy conducts a free site survey covering all six factors, most issues are identified and resolved before installation begins, with no disruption to the PM Suryaghar subsidy timeline.
Why a Pre-Installation Roof Inspection Matters
Skipping a proper roof inspection leads to real, expensive problems:
Problem 1, Water leakage after installation: Mounting brackets drilled into a compromised waterproof membrane create entry points for water. Repairing a leaking roof with panels already installed costs ₹30,000–₹80,000 more than repairing the roof first.
Problem 2, Structural damage: A roof slab with hairline cracks, carbonation of the rebar, or reduced concrete strength may not sustain 12–15 kg/m² of panel and mounting structure load over 25 years. In extreme cases, concentrated point loads from mounting feet can cause local slab failure.
Problem 3, Suboptimal generation: A roof with unexpected shading, a neighbour’s new floor, a water tank shadow, that wasn’t identified before installation will permanently underperform. Re-positioning panels later is disruptive and costly.
Problem 4, DISCOM inspection failure: If your DISCOM engineer visits for net metering commissioning and finds structural concerns or compliance issues, they can reject the installation, the same way a rejected Suryaghar roof photo delays subsidy disbursement. You’ll need to remove and re-install components before subsidy disbursement.
The complete solar installation guide for Gujarat explains the full process from first site visit to net meter commissioning, and our guide to preparing your roof before installation covers the remediation work that often follows an inspection.
The Heaven Green 6-Factor Roof Readiness Assessment
Heaven Green Energy uses a structured pre-installation framework called the Heaven Green Roof Readiness Score: six factors each rated on a 1–5 scale. A minimum total score of 24/30 is required before we schedule an installation date.
This framework ensures that every roof we work on meets the technical, structural, and compliance requirements for a 25-year solar installation. Here is what each factor covers:
Factor 1, Structural Integrity (max 5): Checks concrete condition, visible cracks, rebar exposure, waterproofing membrane condition, and age of the structure.
Factor 2, Usable Shadow-Free Area (max 5): Measures the roof area that receives unobstructed sun from 9 am to 4 pm, accounting for water tanks, staircases, parapets, and neighbouring structures.
Factor 3, Roof Orientation (max 5): True south orientation scores 5; east or west orientation scores 2–3 (generation reduces); north-facing scores 0 (unsuitable).
Factor 4, Roof Age and Condition (max 5): A roof under 10 years old in good condition scores 5; a roof over 20 years old with visible spalling scores 1–2 and requires civil repair before installation.
Factor 5, Electrical Access (max 5): Ease of running DC cable from roof to inverter location, conduit routing options, and distance to the distribution board.
Factor 6, DISCOM Compliance (max 5): Sanctioned load versus proposed system size, proximity to nearest grid transformer, and any prior DISCOM notices on the connection.
Step-by-Step: How to Inspect Your Roof Before Solar
Walk through this checklist yourself before your installer’s site visit. You’ll be better prepared, and you may catch issues that save you significant cost.
-
Start from outside, look up at the roof from the street. Check for visible sagging, cracks along the parapet wall, or discolouration that suggests water damage. If the roof edge parapet shows horizontal cracks, concrete carbonation may be occurring, flag for a civil engineer.
-
Go up to the roof in the morning (9–10 am) and observe which parts are in shade. Use your phone’s sun-tracking app (Suneye or Sun Seeker) to map shadows at noon and 3 pm. Note water tanks, staircase covers, telecom towers on adjacent buildings, and trees.
-
Measure the usable shadow-free area. Use a tape measure or laser distance measurer, or use satellite roof measurement tools for a faster first estimate before your installer’s visit. Exclude areas within 1.5 m of the parapet edge (wind load clearance zone) and within 2–3 m of shadow-casting objects.
-
Check the roof surface for cracks, spalling, and waterproofing condition. Tap the surface with a wooden stick, a hollow sound indicates delamination of the topping layer. Look for white salt deposits (efflorescence), which signal water penetration through the slab.
-
Verify orientation with a compass. True south in India is the optimal direction. Use a hardware compass, not your phone (which measures magnetic south, approximately 1–2° different). Mark true south on the roof for your installer.
-
Locate the distribution board (DB) and measure the cable routing distance. The DC cable run from panels to inverter should ideally be under 30 m to minimise resistive losses. Identify conduit routing options, internal cable trays or surface conduit along walls.
-
Check your electricity bill for sanctioned load. The DISCOM allows solar system size up to the sanctioned load (in kW) or 10 kW, whichever is lower. If your sanctioned load is 3 kW (2-phase or single-phase connection), you cannot install more than 3 kW of solar without a load upgrade.
-
Look for any DISCOM notifications or notices attached to your meter box. Outstanding dues, load reduction notices, or disputed meter readings can delay net metering approval.
⚠️ Watch out
Never allow a solar installer to drill mounting bracket holes into a roof without first waterproofing the drilling points. Installers should use bonded sealant or flashing boots around every anchor point. This is a mandatory step, not optional, and should be specified in your installation contract.
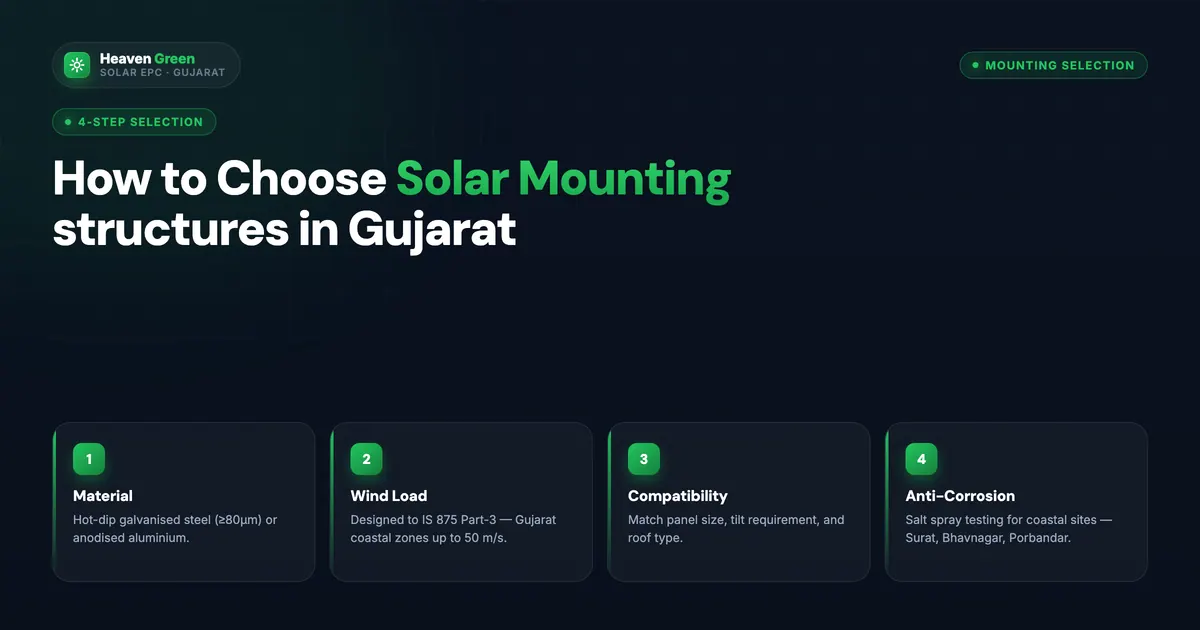
Roof Types and What Each Means for Solar
Different roof types need different mounting approaches and have different risk profiles, our guide to choosing solar mounting structures compares these options in more detail.
| Roof Type | Solar Compatibility | Mounting Method | Key Risk |
|---|---|---|---|
| Flat RCC (most common) | Excellent | Adjustable HDG steel frames | Needs waterproof drill sealing |
| Sloped Mangalore tile | Good with care | Tile hooks or rail system | Tile cracking if hook points not reinforced |
| Metal sheet (GI/colour-coated) | Excellent | Clamp-based, no drilling | Sheet corrosion at clamp contact points |
| Polycarbonate / fibre | Not recommended | N/A | Cannot sustain panel weight |
| Old reinforced brick | Needs assessment | Special anchor plates | Brick may not hold anchor torque |
| Roof terrace garden | Possible with design | Ballasted (weighted) frames | Weight adds significantly |
Most 3BHK homes in Gujarat, Maharashtra, and Rajasthan have flat RCC roofs, the ideal base for solar installation. Rooftop solar in Gujarat covers local roof types and GEDA compliance requirements.
Shading Analysis: The Most Overlooked Inspection Step
Shading is the single biggest cause of long-term underperformance, and it is the step most homeowners skip because it requires observation at multiple times of day. Professional installers often use solar shading analysis software to model shadow patterns across all four seasons rather than relying on a single site visit.
How to do a proper shading assessment:
Stand at your planned panel array location and observe:
- 9 am: Is any part of the roof in shadow from eastern neighbours, trees, or your own staircase?
- 12 pm: Where does the water tank shadow fall?
- 3 pm: Does the western parapet or a neighbouring building shade the western section of the roof?
Seasonal variation matters too. In December, the sun is lower in the sky, shadows from the same water tank are 50% longer than in June. If your inspection is in summer, mentally extend all shadow lengths by 40–60% to simulate winter conditions.
The minimum sunlight rule: Any panel that receives less than 5 hours of unobstructed sun per day (annual average) will not contribute meaningfully to the system. Exclude those zones from panel placement.
💡 Fast tip
Take 3 photographs of your roof from the same position, at 9 am, 12 pm, and 3 pm on the same day. Share these with your installer before the site visit. This simple step cuts the on-site assessment time in half and helps the designer plan panel layout more accurately.
Structural Load Check: When to Call a Civil Engineer
Most residential RCC roofs in India built after 1990 under IS 456 (Code of Practice for Plain and Reinforced Concrete) are designed to handle a live load of 150–200 kg/m². Solar panels and mounting structures add 12–15 kg/m², a small fraction of design capacity.
However, you should insist on a formal structural assessment when:
- The building was constructed before 1980
- Visible cracks, spalling concrete, or exposed rebar are present
- The rooftop already carries heavy loads (large water tanks, AC units, storage)
- The building is in a seismic zone III–V and panels are being added to an unreinforced masonry (URM) structure
- You cannot find the original building structural drawings
A structural assessment from a qualified civil engineer costs ₹5,000–₹15,000 and takes 2–3 days. It is a small price relative to the cost of installation plus 25 years of ongoing structural safety. For roofs requiring detailed load calculations, dedicated solar civil and structural engineering services can verify compliance with wind load and seismic design norms before installation begins.
Pros and Cons of DIY Inspection vs. Professional Site Survey
- Free, can be done at your own pace
- Prepares you to ask better questions of your installer
- Identifies obvious red flags early
- Can be done any time before you contact installers
- Cannot assess concrete carbonation or internal rebar condition
- May miss seasonal shading patterns
- Cannot calculate exact panel layout and cable routing
- DISCOM compliance check requires knowledge of local tariff rules
Book your free site survey. Heaven Green Energy’s engineers cover Ahmedabad, Surat, Rajkot, Vadodara, and Morbi, we visit within 24 hours and send a written site report within 48 hours. Get your free site assessment →
Common Roof Problems and Solutions Before Solar
| Problem Identified | Action Required | Cost Range | Timeline |
|---|---|---|---|
| Surface cracks (hairline) | Polymer sealant injection | ₹3,000–₹8,000 | 1–2 days |
| Waterproofing membrane damaged | Re-waterproof with ACC/SikaTop | ₹8,000–₹20,000 | 3–5 days |
| Rebar exposed / concrete spalling | Structural repair + rebar treatment | ₹20,000–₹60,000 | 5–10 days |
| Shadow obstruction (water tank) | Relocate tank or adjust panel layout | ₹5,000–₹15,000 | 1–2 days |
| Insufficient sanctioned load | Apply for load upgrade with DISCOM | ₹2,000–₹10,000 | 15–30 days |
| Old parapet wall unstable | Parapet reinforcement | ₹15,000–₹40,000 | 3–7 days |
These repairs add time and cost to your project, but they are always worth doing before installation rather than after.
How Heaven Green Energy Handles the Inspection
Every Heaven Green Energy installation starts with a free site survey. Our engineers visit within 24 hours and use our Roof Readiness Score to document roof condition, shading profile, orientation, and DISCOM compliance in a written report. You receive this report before signing any installation contract, so you can make informed decisions.
In Gujarat, we coordinate with GEDA-empanelled structural engineers when roof assessments indicate concerns. We also handle the DISCOM sanctioned load upgrade application if your current load is insufficient for the planned system size. Once your system is commissioned, the same systematic mindset applies to ongoing upkeep, this pre-monsoon solar inspection checklist covers the seasonal checks worth repeating every year.
- Residential Solar: 1–10 kW installations with complete site assessment.
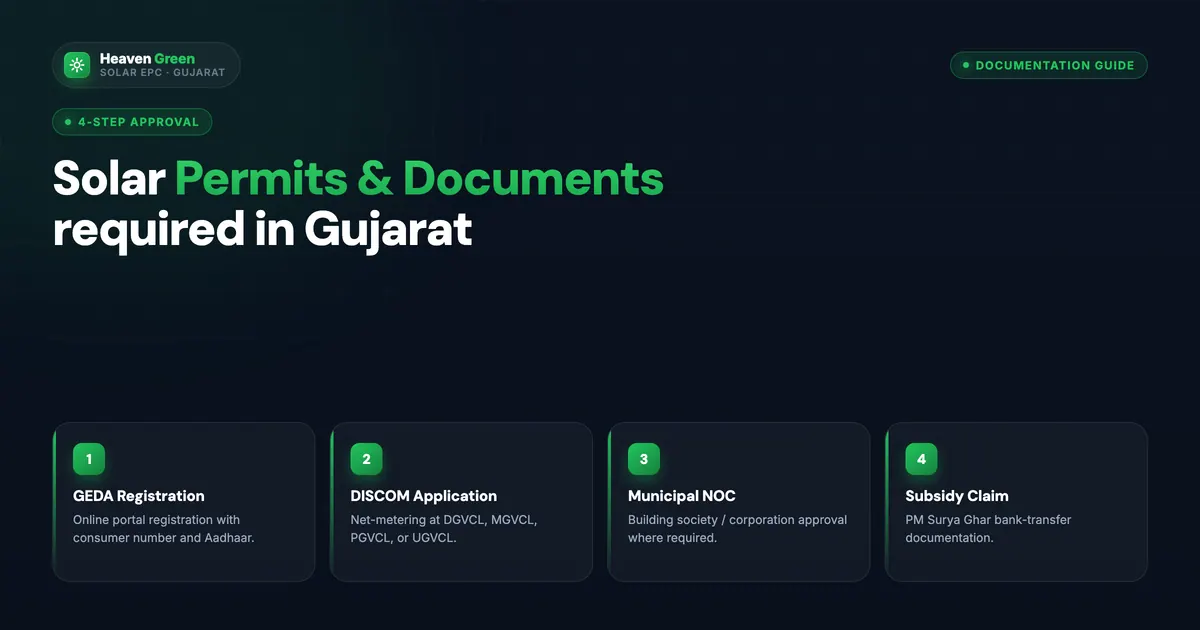
- Solar Permits and Approvals: DISCOM documentation guide for Gujarat.
- Solar Calculator: see your system size and savings estimate before your site visit.
- Contact our survey team: book a free roof assessment within 24 hours.
Frequently Asked Questions
What roof type is best for solar panels in India?
Flat RCC (reinforced cement concrete) roofs are ideal, they allow flexible panel placement, adjustable tilt mounting, and easy maintenance access. Sloped Mangalore tile roofs work well with tile-hook mounting systems but require more careful installation to prevent tile cracking. Metal sheet roofs are also good candidates using clamp-based mounts that require no drilling.
Do I need a structural engineer certificate for my roof before solar?
A formal structural engineer certificate is not mandatory for all DISCOM applications. However, some DISCOMs and state energy authorities require it for systems above 5 kW. Many installers include a basic structural suitability observation in their site survey. For buildings over 30 years old or with visible structural concerns, a paid structural report (₹5,000–₹15,000) is strongly recommended before committing to installation.
How do I find out my roof’s sanctioned load limit for solar?
Your sanctioned load is shown on your DISCOM electricity bill or contract demand document. It is the maximum kW load the DISCOM has officially approved for your connection. Your solar system size cannot exceed this figure. To increase your sanctioned load, apply for a load enhancement at your DISCOM office, in Gujarat, UGVCL/DGVCL process these within 15–30 working days. If your proposed system size doesn’t match your sanctioned load, see this guide to fixing a Suryaghar sanctioned load mismatch.
What direction should solar panels face in India?
True south is optimal for maximum annual generation in India. Systems facing true south at a tilt equal to the local latitude (typically 10–25° for most Indian cities) generate 5–12% more annually than east- or west-facing systems. If true south is not possible due to roof layout, a 15° deviation to southeast or southwest loses only 3–5% annual generation.
Can I install solar panels on a rented property?
Installing solar on a rented property requires the landlord’s written consent, as the panels are fixed to the structure. Most landlords are supportive once they understand the installation is reversible and adds value to the property. The PM Suryaghar subsidy goes to the electricity bill holder, ensure your rental agreement names you as the DISCOM consumer to maintain subsidy eligibility.
How long does a professional site survey take?
A thorough site survey by an experienced solar engineer takes 45–90 minutes. This includes measuring the roof, assessing shading, inspecting the structure, checking the distribution board, reviewing the electricity bill, and photographing all relevant areas. Heaven Green Energy provides a written site report within 48 hours of the survey.
What happens if my roof fails the pre-installation inspection?
If the inspection identifies issues, your installer should provide a clear remediation plan with costs and timeline before proceeding. You are under no obligation to proceed with the same installer for civil repairs, get competitive quotes for the repair work, then resume with your chosen solar EPC company once the roof is cleared.