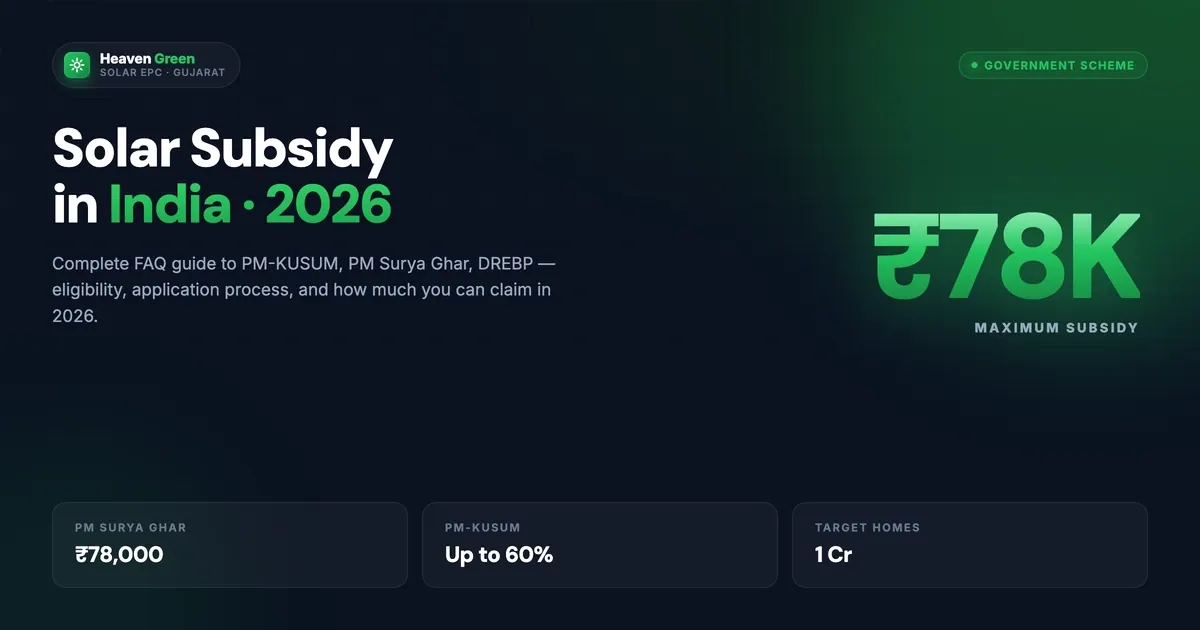
PM Suryaghar Muft Bijli Yojana launched in February 2024 offers up to ₹78,000 subsidy for residential rooftop solar systems. The application is entirely online at pmsuryaghar.gov.in, no office visits required. But the process has multiple steps, specific document requirements, and a few traps that can delay or cancel your subsidy. This guide walks through every step with the information you need to get from registration to subsidy receipt without delays.
Key takeaway. The PM Suryaghar online application takes 20–30 minutes to complete if you have your documents ready. The full process from application to subsidy disbursement, including DISCOM inspection, installation, net meter installation, and DBT, typically takes 60–90 days. The central subsidy is ₹30,000 for 1 kW, ₹60,000 for 2 kW, and ₹78,000 for 3+ kW residential systems. Heaven Green Energy, as an MNRE-empanelled installer, handles the application process end-to-end for its customers.
Before you start, confirm your eligibility: PM Suryaghar is for residential consumers only (not commercial or industrial), your property must have a valid DISCOM electricity connection, and the system must be installed by an MNRE-empanelled vendor.
What Is PM Suryaghar and Who Is Eligible?
PM Suryaghar Muft Bijli Yojana (PM Solar Home Free Electricity Scheme) is a central government initiative by the Ministry of New and Renewable Energy (MNRE) that provides direct benefit transfer (DBT) subsidies for residential rooftop solar systems. The scheme aims to install 1 crore rooftop solar systems across India by 2027.
Eligibility criteria:
- Indian residential consumer (household, not commercial or industrial)
- Valid electricity connection with DISCOM, the consumer number is required
- Property (owned or rented with owner consent) where roof access is available
- Bank account linked to Aadhaar (for DBT subsidy disbursement)
- System installed by an MNRE-empanelled vendor, DISCOM-approved in your state
Subsidy quantum (2026):
| System size | Central subsidy |
|---|---|
| 1 kW | ₹30,000 |
| 2 kW | ₹60,000 |
| 3 kW and above | ₹78,000 (capped) |
States like Gujarat, Maharashtra, and Rajasthan offer additional state subsidies on top of the central amount. For the latest state-level stacking, see our PM Suryaghar complete guide 2026.
Documents You Need Before Starting
Gather these documents before opening the portal, incomplete applications are a leading cause of rejection and delays:
- Electricity bill (latest): showing your consumer number, sanctioned load, and DISCOM connection details. The consumer number is your primary identifier on the portal.
- Aadhaar card: for identity verification and linking to DBT account.
- Bank account details: account number and IFSC code of a bank account linked to your Aadhaar. Subsidy is disbursed via DBT directly to this account.
- Passport-size photograph: recent photo in JPG format.
- Roof photograph: a clear photo of the installation area (optional at registration, mandatory at inspection).
- Property ownership proof: if applying as owner. Registered renters may need a no-objection certificate (NOC) from the property owner.
For the complete document checklist with state-specific requirements, see our PM Suryaghar document checklist.
⚠️ Watch out
Your Aadhaar must be linked to your bank account for subsidy DBT. If not linked, the subsidy cannot be credited even after successful installation. Check your bank account's Aadhaar linkage status before applying, most bank apps or the UIDAI website can confirm this in seconds.
The 5-Stage PM Suryaghar Application Process
We call this the 5-Stage Suryaghar Funnel: the sequential process from online registration to subsidy in your bank account.
Stage 1: Online Registration at pmsuryaghar.gov.in
- Open https://pmsuryaghar.gov.in in your browser.
- Click “Apply for Rooftop Solar”.
- Select your state and DISCOM from the dropdown menus.
- Enter your Consumer Number (from your electricity bill) and register with your mobile number via OTP.
- Fill in your personal details, name, address, Aadhaar number, bank account details.
- Upload the required documents, electricity bill, Aadhaar copy, passport photograph.
- Submit the application. You will receive an Application Reference Number (ARN) via SMS.
The ARN is your tracking ID for all subsequent steps. Save it.
Stage 2: DISCOM Feasibility Approval
After you submit, your DISCOM (UGVCL, DGVCL, MSEDCL, BESCOM, or your local utility) reviews your application for technical feasibility:
- Is the existing connection sanctioned load sufficient?
- Is the proposed system size within the permitted limits (rooftop solar cap is typically 10 kW for residential)?
- Is the transformer in your area capable of accepting additional solar power?
Timeline: 7–15 working days. DISCOM sends approval via SMS and the portal updates your application status.
Common cause of delay at this stage: Incorrect consumer number, name mismatch between application and electricity bill, or pending electricity arrears on the account.
Stage 3: Select an MNRE-Empanelled Vendor and Install
Once you receive DISCOM feasibility approval, you can proceed to installation.
- Log in to the portal and select an MNRE-empanelled vendor from the approved list. Before committing, it is worth checking how to check a vendor’s rank on the portal, since rank affects how quickly your application gets prioritised.
- The vendor conducts a site survey and provides a detailed quote.
- Confirm the system size and panel specifications (must be ALMM-listed panels).
- Sign the installation agreement and pay the vendor’s quoted price minus the subsidy amount you will receive later.
Note: You pay the full installation cost upfront and receive the subsidy as DBT after commissioning. Some installers offer bridge financing arrangements to reduce this cash outlay. Heaven Green Energy is MNRE-empanelled across UGVCL, DGVCL, MGVCL, and PGVCL in Gujarat. For readers comparing panel and inverter specifications commonly used in these installations, QBits Energy’s PM Surya Ghar Yojana guide covers the technical side in more depth.
Stage 4: Installation, Net Meter Application, and Commissioning
The vendor installs the solar system and applies for net meter installation with your DISCOM. This is done through the same portal:
- Vendor uploads installation completion report and photographs.
- DISCOM schedules a site inspection, typically within 5 working days.
- DISCOM inspector verifies the installation against specifications.
- Net meter is installed by DISCOM (this can take 7–30 days depending on the DISCOM).
- System is commissioned, officially connected to the grid.
Stage 5: Commissioning Report and Subsidy Disbursement
After commissioning:
- The vendor uploads the commissioning certificate to the portal.
- DISCOM verifies and approves the commissioning report.
- The portal generates a subsidy disbursement request.
- MNRE releases the subsidy amount via DBT to your Aadhaar-linked bank account.
Timeline: 30 days from commissioning approval to DBT credit. Total from application to DBT: typically 60–90 days with clean documents.
Get a free site assessment. Our engineers handle every stage, from portal registration to subsidy disbursement, for you. Get your free quote →
The Application Portal: Common Issues and Fixes
These are the most frequent technical issues applicants encounter on the pmsuryaghar.gov.in portal:
| Issue | Cause | Fix |
|---|---|---|
| Consumer number not recognised | Typo or DISCOM not selected correctly | Double-check your bill; select exact DISCOM from dropdown |
| OTP not received | Mobile number not linked to Aadhaar | Link Aadhaar-mobile with your telecom operator |
| Application stuck at “feasibility pending” > 15 days | DISCOM backlog | Contact DISCOM’s solar helpline; raise an escalation via the portal |
| ”Name mismatch” rejection | Name on Aadhaar differs from electricity bill | Submit a name correction request to your DISCOM office |
| Subsidy not credited after commissioning | Aadhaar not linked to bank account | Link Aadhaar to bank account via your bank’s app or branch |
For a deeper dive into rejection reasons and how to fix them, see our PM Suryaghar rejection reasons guide. If you are stuck on a specific error message rather than a rejection, our PM Suryaghar portal error-fix guide walks through each one.
State-Specific Variations You Need to Know
The central PM Suryaghar process is the same across India. State-level variations affect subsidy quantum and DISCOM approval timelines:
Gujarat: UGVCL, DGVCL, MGVCL, and PGVCL are the four DISCOMs. Gujarat’s Suryashakti Kisan Yojana (SKY) adds a state subsidy on top of the central amount for farmers. Heaven Green Energy is GEDA-empanelled and handles subsidy applications across all four Gujarat DISCOMs. See our PM Suryaghar Gujarat complete guide.
Rajasthan: JVVNL, JdVVNL, and AVVNL are the DISCOMs. Rajasthan has additional state subsidies and faster average DISCOM approval timelines. See our PM Suryaghar Rajasthan complete guide.
Maharashtra: MSEDCL is the primary DISCOM. Maharashtra’s Mukhyamantri Saur Krushi Vahini Yojana adds state-level solar support for farmers. See our PM Suryaghar Maharashtra complete guide.
Pros and Cons of the PM Suryaghar Application Process
- Fully online, no office visits required
- Single national portal for all states
- DBT directly to bank, no cash handling
- Transparent tracking via ARN at every stage
- Portal can be slow or time out during peak hours
- DISCOM delays at feasibility stage vary widely
- Full payment required before subsidy arrives
- Aadhaar-bank linkage errors can block DBT
How Heaven Green Energy Helps You Apply
Heaven Green Energy is MNRE-empanelled for PM Suryaghar across Gujarat. Our in-house documentation team handles the portal registration, document submission, DISCOM coordination, and commissioning report upload on your behalf, so you do not have to navigate the portal yourself.
- Residential solar systems: complete 1–10 kWp installations with PM Suryaghar subsidy managed end-to-end.
- PM Suryaghar subsidy guide: the full national scheme explanation.
- Solar calculator: see your system size, cost after subsidy, and payback instantly.
- Contact Heaven Green Energy: call +91 63904 05060 or request a callback.
For understanding whether to use both central and state subsidies together, see our Suryaghar vs state subsidy stacking guide.
Frequently Asked Questions
How long does PM Suryaghar application take from start to finish?
The online registration takes 20–30 minutes with documents ready. DISCOM feasibility approval takes 7–15 working days. Installation takes 2–5 days once materials arrive. Net meter installation takes 7–30 days (DISCOM-dependent). Subsidy DBT arrives within 30 days of commissioning approval. Total: 60–90 days from registration to money in bank account, assuming clean documents and no DISCOM backlog.
Can a tenant apply for PM Suryaghar subsidy?
Yes, tenants can apply but need a No-Objection Certificate (NOC) from the property owner confirming consent for solar installation. The electricity connection must be in the applicant’s or owner’s name. The subsidy is credited to the applicant’s Aadhaar-linked bank account. Some DISCOMs have additional documentation requirements for tenant applications, check with your local DISCOM or MNRE-empanelled installer.
What happens if my PM Suryaghar application is rejected?
Common rejection reasons include name mismatch between documents, incorrect consumer number, pending electricity bill arrears, or technical infeasibility (insufficient roof space or transformer capacity). Log in to the portal using your ARN to see the rejection reason. Most rejections can be resolved by correcting the specific issue and reapplying. For a detailed list of rejection reasons and fixes, read our PM Suryaghar rejection reasons guide.
Do I pay the full solar system cost and get subsidy later, or is subsidy deducted upfront?
Under PM Suryaghar, you pay the full installation cost to the vendor upfront. The MNRE releases the subsidy as a DBT to your Aadhaar-linked bank account after commissioning is verified, typically within 30 days of the net meter installation. Some installers, including Heaven Green Energy, offer payment plans that account for the expected subsidy amount, reducing the immediate cash outlay.
Which solar panels qualify for PM Suryaghar subsidy?
Only panels from the MNRE’s ALMM (Approved List of Models and Manufacturers) qualify for PM Suryaghar subsidy. Your installer must use ALMM-listed panels, installing non-ALMM panels forfeits the subsidy. The ALMM list is available on the MNRE website and is updated periodically. Heaven Green Energy uses only ALMM-listed panels from brands including Adani Solar and Waaree Energies.
Can I apply for PM Suryaghar if I already have a solar system installed?
No, PM Suryaghar subsidy applies to new installations only. If you installed a solar system before registering on the portal, you are not eligible for the central subsidy. Existing solar system owners can, however, apply for system expansion (adding panels to an existing system), the additional capacity would need to be installed through the portal process with an MNRE-empanelled vendor.
What is the maximum solar system size eligible for PM Suryaghar subsidy?
The PM Suryaghar subsidy is capped at ₹78,000 regardless of system size (3 kW and above get the same ₹78,000). However, you can install a system larger than 3 kW, for example, a 5 kWp system, and still receive the ₹78,000 subsidy for the first 3 kW. The incremental capacity above 3 kW does not receive additional central subsidy, though some state subsidies may cover it.